

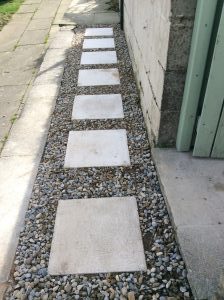
A question we often get asked is how to lay stepping-stones on gravel? Well you could just lay them loose on the gravel surface and you’re done! But often you will find that the stepping-stones laid on gravel will become loose. Which then start sliding around and becoming uneven over time.
If you want to learn how to lay your paving slabs firmly on the gravel surface or within stone chippings with a good solid foundation and a nice even surface then why not read our step-by-step instructions below. We have also provided an easy-to-follow guide with pictures of the laying process. You can watch our short video on how to lay stepping-stones on gravel.
What you need to lay stepping-stones on gravel.
Tools you need to lay stepping-stones
- Trowel
- Spirit level or straight-edged timber
- Rubber mallet or wood handled hammer
- Shovel or spade
- Tape measure
- Strong string or builders line
- Line pins or small timber stakes (for fastening string)
- Paint brush for applying PVA
- Cement mixer (you can mix by hand as I did)
Materials you need, assuming you already have gravel
- Builders sand or grit sand
- Portland cement or post mix
- Stepping stones of your choice (We have used Marshalls square concrete slabs. Laying method is the same whatever kind of slab or stepping stone you decide to use, square or round)
- PVA glue for outdoor use or SBR glue
- Water with small amount of washing up liquid or plasticisers

We hope by reading or watching this video guide it gives you a good understanding of how stepping-stones are fixed firmly in place within gravel chippings.
There are many shapes and sizes of paving slabs you could lay on gravel as a stepping stone. Concrete or stone, circular, square or oblong all make good stepping-stones and the method of laying them in gravel remains the same whatever type you want to use.

- SUPERIOR ADHESION – A premium latex-based water-resistant bonding agent and admixture. Improved adhesion to a wide range of substrates including concrete, steel, and tiles. Ideal for external use.
- WATER RESISTANT – Excellent for use in areas subject to humidity, dampness, and water contact. Ideal for external renderings, mortars, and screeds.
- DURABLE – This bonding agent forms a reinforcing polymer that increases long-term durability and flexibility.

- FLEXIBLE – Suitable for use as a flexibiliser for cementitious-based tile adhesives when used on wooden and asphalt flooring.
- WATER RESISTANT – Unlike PVA, SikaBond SBR+ is not negatively affected by wet conditions and is suitable for exterior use.
- EXCELLENT WORKABILITY – Reduces water to cement ratio, allowing this general purpose admixture to be applied in thinner, more workable sections.

- UPDATED BRAND – Product previously know as Everbuild 503 S.B.R. Bond
- WATER RESISTANT – Excellent for use in areas subject to humidity, dampness, and water contact. Ideal for external renderings, mortars, and screeds
- SUPERIOR ADHESION – A premium latex-based water-resistant bonding agent and admixture. Improved adhesion to a wide range of substrates including concrete, steel, and tiles. Ideal for external use.
Watch our video on how to lay stepping-stones on gravel
Please watch our short video below on how to lay stepping-stones on gravel. You can stop or rewind the video at anytime during the playing of the video if you need to take notes.
Step-by-step instructions on how to lay stepping-stones on gravel
There are just 10 easy steps to laying stepping stones to create a safe path or walkway laid on your gravel. For this tutorial we are going to lay our two end stepping stones first then lay the ones in between.
*Update 2024. We would now recommend that you use SBR glue instead of PVA for the back of your paving slabs. This is because of the latest guidelines and because it becomes waterproof when dried. PVA will still work well but as always things sometimes change.
1. Apply PVA glue to the reverse of the stepping stone slabs

First we apply PVA glue (for outdoor use or as recommended SBR) to the back of our slabs. Then, if possible, allow the PVA glue to dry or become tacky.
We apply the glue because PVA works by sticking the underneath of the slab to the cement mortar we are going to lay our stepping upon.
This then creates a bond between the mortar and slab. This stops the paving slab from becoming loose or sliding off the cement bed once dried.
2. Loosely lay out the stepping-stones one stride apart

Once the PVA has dried, lay out the stepping-stones and check the distance you need to lay them apart. The distances don’t have to too accurate.
Everybody has different sized strides. You don’t want to be stretching or taking little strides when walking on the paving slabs. You need to be able to comfortably stride from center of one to the centre of the next. Please remember it’s not just you who may walk on the stepping-stones. If you have children or an elderly parent then place the slabs closer together.
Once you are comfortable with the distance the paving slabs are apart, measure the distance for future reference when you start laying the slabs. Keep the stepping stones straight with a spirit level or straight edge when measuring to get a true uniform measurement.
3. Remove the gravel where the slabs are to be laid and compact the area down

The first two stepping stones we lay are at either end of the area we are going to pave. We lay the two stepping-stones on the outside first so we can fix a string line between the two points. This then allows us to level the remaining slabs in-between the slabs on the gravel.
We need to remove the gravel from the area we are going to lay our slabs. Save the gravel to replace around the paving slabs once they have been laid. You can remove all the gravel if you wish. It is sometimes beneficial if you do. But for this job we took the easier option of just removing the gravel where the stepping stones were going to be laid.
When the gravel as been removed we then need to compact the area to stop the area from sinking. You could use a metal tamper as we have done here or you could firm down with your feet, a hammer and piece of flat wood or any other method you see fit. You need to be confident the ground below the slab has a solid and firm foundation.
4. Place mortar mix on cleared gravel area then level out with trowel

Once you have cleared the gravel and firmed the surface you need to place a shovel full of mortar mix onto the cleared area.
We have used a wet mortar mix of 5 parts of building sand mixed with 1 x cement. You can use other kinds of sand such as grit or sharp sand. You could use a post mix concrete mix. That is, a mix of sand and cement that is ready-mixed in a bag. This is ideal if you are unsure about mixing sand and cement.
Level out the cement mix evenly with a cement trowel to give a full bed of mortar. This needs to cover the whole area of where the stepping stone will sit. Place the slab gently onto the mix.
You can read how to make the mortar mix for the laying of stepping stones at the bottom of this page
5. Check your measurements between laid slabs
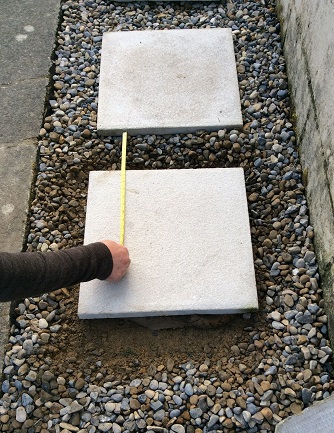
Once the slab has been placed upon the mortar, we use the measurements taken when you first laid the slabs out loosely. Gently move the slab into position using the tape measure. Try not to push down too hard on the mortar bed below.
You can use a spirit level or straight-edged timber to square up the slab to give you a correct measurement.
You don’t have to be too precise with your measurements between the slabs just yet. We are going to be leveling up the slab by hitting it with a hammer so it will need the measurements checking again afterwards.
6. Tap down the stepping-stone to make level

Once you are confident that the slab is in the correct place you need to gently tap down the slab to level it up.
Begin to gently tap down the surface. Make sure you don’t tap the edges. But tap from the centre out to a third from the edge of the slab. This also helps spread the mortar mix underneath the slab as well as bonding the mortar and slab together via the PVA.
Periodically check the level of your slab. The bubble in the spirit level should be within the two marks marked on the level. You can if you wish, put a fall on the slabs if your stepping stone is laid on a slope. t you have large slabs and want to ensure the water runs off the surface. This small type of spirit level we have used is often referred to as a ‘boat level’.
Place the spirit level in both directions to make sure the slab is level both ways. Keep tapping the slab gently until this is achieved. Remember! Tap the slab towards the centre of the slab avoid tapping the slab on the edges.
7. Point mortar up the side and around the sides of the stepping-stone slab

After leveling the paving slab you then need to push mortar into any gaps underneath the slab. This ensures that there is mortar underneath the whole flag. This will help stabilize the flag and stop the possibility of it rocking on its base. This also gives it extra strength.
Then build up the mortar against the sides of the slabs to help create a small buttress of mortar up the side of the slab. Try not to go above 3/4 of the way up the slab. This will help secure your slab in place and stop it sliding off the mortar bed.
Keep an eye on the level of your slab as you work by periodically placing your spirit level on the surface. You may need to re-tap the surface of the slab after pushing mortar into gaps or up the side of the stepping stone to re-level.
8. Fix string line pins to the side of the two laid slabs

Once you have laid your two end stepping-stones, you then need to fix a taut string line between the two slabs. This is to allow you to set the remaining slabs in place in a straight line. If you prefer, You don’t have to use a string line.You could just eye them through, use a straight piece of wood or just lay them randomly.
Here we have used a metal line pin. Hammered into the ground. You could use timber, a large stone or anything you think would be suitable to hold your string tight.
You need to make sure your pin is fixed firmly in place. You don’t want the pin to move during the laying of your stepping stones.
We then adjust the string ensuring the string is in line & level with the two laid slabs.
9. Lay the remaining slabs level with the string line

When you are confident the string is tight (this is needed to stop the string dipping in the middle) Lay the remaining stepping-stones level with the string line. Follow the laying method for each slab as shown above.
You can use a spirit level or straight-edged timber to make sure the slabs are all level with each other. It does not really matter if the slabs are laid completely level. This is because it is unlikely that the ground will be completely level. Often the stepping stones will be laid on a slightly sloping surface.
This is why we lay the two end slabs first then fix a string line between them.This way the slabs end up level between the two end slabs.
10. When finished laying the stepping-stones replace the gravel around the slabs

Once you have finished laying the remaining stepping-stones, follow section 7. again to ensure all the slabs are laid firmly in place.
You can then remove the string line and pins and then gently replace any gravel around the slabs. Be careful not to move the slabs as they will take at least 24 hours to dry correctly.
Finish by securing the area to make sure they are not stepped upon until the have had chance to dry correctly. If for any reason they do have to be walked on before they are set, make sure your weight is placed in the middle of the paving slab and not the edge of the slab.
I would always recommend waiting at least 24 – 48 hours before you begin to walk on the surface of the slabs. You now know how to lay stepping-stones on gravel.
How to make the mortar mix to lay our stepping-stones on
We are going to lay our paving slabs on a bed of mortar consisting of sand, cement & water. You could use a cement mixer or mix the ingredients on the floor. Because we only used 4 bags of sand, we mixed our mortar in a wheel barrow.
This is mixed at a ratio of 5 parts building sand to one part of cement. We wet the mix with water to create a firm but pliable mix. You can add plasticizers to the water or a little washing up liquid to make your cement a little smoother to work with. But remember when using plasticizers you will need less water. Add the water slowly as we do not want our mortar mix to become sloppy. If the mix does become sloppy just add more sand & cement to the mix. You need the motor mix to be quite firm so it supports the paving slab. If the cement mix is too sloppy the mix will not support the slab and the slab will just sink into the mix.
You could use grit sand if you want but we find that building sand is more able to ‘stick’ to the paving slab to create a good adhesion better than grit sand does. Once stuck it helps keep the slab firmly in place once dry and set.
Should you remove the gravel or not before laying the slabs?
You could remove all the gravel before you begin to lay the stepping-stones but we often get asked how to lay stepping-stones on gravel without first removing all the gravel. This is probably because gravel is often laid before most people consider laying slabs to make the gravel easier to walk on. So this is the method we will use where we just remove the area of gravel where the paving slabs will be fit. If you do have time and the capability of first removing the gravel before you lay the stepping stone we would recommend you do this first. Although it takes more time using that method it can often be easier in the long run.
If you would like to buy the materials or tools needed to lay stepping-stones on gravel why not visit our paving shop. You will find many materials and paving tools available to buy at the best-selling prices. With many discounted to below factory prices.
Leave a Reply